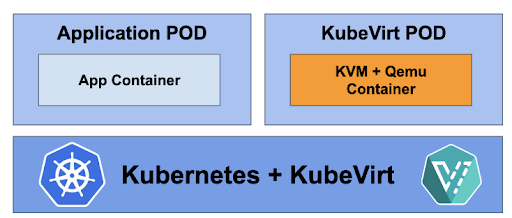
A Working Kubevirt Tutorial
A Working Kubevirt Tutorial 🙂
Why?
Well, after installing a few pre-packaged Kubernetes Virtualization platforms, I decided to try adding KubeVirt manually to Kubernetes. The KubeVirt tutorials out there mostly don't work, unfortunately. I finally found a process that works and thought I would write the process down to help anyone else that may be struggling. (Also, I recently found this tutorial which was more helpful/accurate than most.)
What?
You will need:
- Access to a computer or virtual machine or cloud VM
- A Linux distribution
- A Kubernetes distribution (I have been successful with quite a few. Microk8s, Minikube, k3s, Kind are super easy to install and have low overhead.)
- Patience
- Possibly, a quiet room to scream in

How?
Install Kubernetes
Any Kubernetes should work. For this blog, we'll install the SUSE Rancher k3s Kubernetes. For no particular reason; it's just easy to install and it works. What's also fun is the k3OS ISO that you can boot and have a working Linux distro with Kubernetes and kubectl pre-installed. k3OS is an ephemeral OS, so keep that in mind.
To install k3s:
$ curl -sfL https://get.k3s.io | sh -
[INFO]  Finding release for channel stable
[INFO]  Using v1.29.6+k3s2 as release
[INFO]  Downloading hash https://github.com/k3s-io/k3s/releases/download/v1.29.6+k3s2/sha256sum-amd64.txt
[INFO]  Downloading binary https://github.com/k3s-io/k3s/releases/download/v1.29.6+k3s2/k3s
[INFO]  Verifying binary download
[INFO]  Installing k3s to /usr/local/bin/k3s
[INFO]  Skipping installation of SELinux RPM
[INFO]  Skipping /usr/local/bin/kubectl symlink to k3s, command exists in PATH at /snap/bin/kubectl
[INFO]  Creating /usr/local/bin/crictl symlink to k3s
[INFO]  Skipping /usr/local/bin/ctr symlink to k3s, command exists in PATH at /usr/bin/ctr
[INFO]  Creating killall script /usr/local/bin/k3s-killall.sh
[INFO]  Creating uninstall script /usr/local/bin/k3s-uninstall.sh
[INFO]  env: Creating environment file /etc/systemd/system/k3s.service.env
[INFO]  systemd: Creating service file /etc/systemd/system/k3s.service
[INFO]  systemd: Enabling k3s unit
Created symlink /etc/systemd/system/multi-user.target.wants/k3s.service → /etc/systemd/system/k3s.service.
[INFO]  systemd: Starting k3s
$ sudo k3s kubectl get node
NAME STATUS ROLES AGE VERSION
hostname Ready control-plane,master 33s v1.29.6+k3s2
To interact with k3s, you can either alias kubectl='sudo k3s kubectl' or install the kubectl binary from here.
Here are all the Kubernetes components running with a fresh install of k3s:
$ kubectl get all -A
NAMESPACE     NAME                                         READY   STATUS      RESTARTS   AGE
kube-system   pod/coredns-6799fbcd5-cjmzs                  1/1     Running     0          5m19s
kube-system   pod/helm-install-traefik-46pgd               0/1     Completed   1          5m19s
kube-system   pod/helm-install-traefik-crd-jgfdm           0/1     Completed   0          5m19s
kube-system   pod/local-path-provisioner-6f5d79df6-v4fnl   1/1     Running     0          5m19s
kube-system   pod/metrics-server-54fd9b65b-rdglt           1/1     Running     0          5m19s
kube-system   pod/svclb-traefik-d52c11d5-hq6wb             2/2     Running     0          5m12s
kube-system   pod/traefik-7d5f6474df-h8zw2                 1/1     Running     0          5m12s

NAMESPACE     NAME                     TYPE           CLUSTER-IP      EXTERNAL-IP     PORT(S)
default       service/kubernetes       ClusterIP      10.43.0.1       <none>          443/TCP
kube-system   service/kube-dns         ClusterIP      10.43.0.10      <none>          53/UDP,53/TCP,9153/TCP
kube-system   service/metrics-server   ClusterIP      10.43.4.117     <none>          443/TCP
kube-system   service/traefik          LoadBalancer   10.43.152.158   192.168.1.188   80:30948/TCP, 443:32562/TCP

NAMESPACE     NAME                                    DESIRED   CURRENT   READY   UP-TO-DATE   AVAILABLE   NODE
kube-system   daemonset.apps/svclb-traefik-d52c11d5   1         1         1       1            1

NAMESPACE     NAME                                     READY   UP-TO-DATE   AVAILABLE   AGE
kube-system   deployment.apps/coredns                  1/1     1            1           5m30s
kube-system   deployment.apps/local-path-provisioner   1/1     1            1           5m30s
kube-system   deployment.apps/metrics-server           1/1     1            1           5m30s
kube-system   deployment.apps/traefik                  1/1     1            1           5m12s


NAMESPACE     NAME                                               DESIRED   CURRENT   READY   AGE
kube-system   replicaset.apps/coredns-6799fbcd5                  1         1         1       5m19s
kube-system   replicaset.apps/local-path-provisioner-6f5d79df6   1         1         1       5m19s
kube-system   replicaset.apps/metrics-server-54fd9b65b           1         1         1       5m19s
kube-system   replicaset.apps/traefik-7d5f6474df                 1         1         1       5m12s

NAMESPACE     NAME                                 COMPLETIONS   DURATION   AGE
kube-system   job.batch/helm-install-traefik       1/1           21s        5m28s
kube-system   job.batch/helm-install-traefik-crd   1/1           11s        5m28s
Install the KubeVirt base components
$ KUBEVIRT_VERSION=$(curl -s https://api.github.com/repos/kubevirt/kubevirt/releases/latest | awk -F '[ \t":]+' '/tag_name/ {print $3}')From kubebyexample: "This command will create a namespace, "kubevirt" and install the Custom Resource Definitions for KubeVirt we described earlier, as well as an operator that will wait for a configuration resource to launch the KubeVirt installation."
$ kubectl create -f https://github.com/kubevirt/kubevirt/releases/download/${KUBEVIRT_VERSION}/kubevirt-operator.yaml
namespace/kubevirt created
customresourcedefinition.apiextensions.k8s.io/kubevirts.kubevirt.io created
priorityclass.scheduling.k8s.io/kubevirt-cluster-critical created
clusterrole.rbac.authorization.k8s.io/kubevirt.io:operator created
serviceaccount/kubevirt-operator created
role.rbac.authorization.k8s.io/kubevirt-operator created
rolebinding.rbac.authorization.k8s.io/kubevirt-operator-rolebinding created
clusterrole.rbac.authorization.k8s.io/kubevirt-operator created
clusterrolebinding.rbac.authorization.k8s.io/kubevirt-operator created
deployment.apps/virt-operator created
From kubebyexample: "Now we add the Kubevirt Custom Resource (called kubevirt) that will trigger the KubeVirt operator to install the rest of KubeVirt:"
$ kubectl create -f https://github.com/kubevirt/kubevirt/releases/download/${KUBEVIRT_VERSION}/kubevirt-cr.yaml

kubevirt.kubevirt.io/kubevirt created
Let's see what the new kubevirt namespace contains now:
$ kubectl get all -n kubevirt
NAME                                   READY   STATUS    RESTARTS   AGE
pod/virt-api-98cf864cc-vjqsf           1/1     Running   0          4m14s
pod/virt-controller-5d65ddf8c5-drzp5   1/1     Running   0          3m49s
pod/virt-controller-5d65ddf8c5-j4xms   1/1     Running   0          3m49s
pod/virt-handler-9lj6m                 1/1     Running   0          3m49s
pod/virt-operator-865f487cf6-4crdd     1/1     Running   0          5m30s
pod/virt-operator-865f487cf6-5ghh9     1/1     Running   0          5m30s

NAME                                  TYPE        CLUSTER-IP     EXTERNAL-IP  PORT(S)
service/kubevirt-operator-webhook     ClusterIP   10.43.100.27   <none>       443/TCP
service/kubevirt-prometheus-metrics   ClusterIP   None           <none>       443/TCP
service/virt-api                      ClusterIP   10.43.207.89   <none>       443/TCP
service/virt-exportproxy              ClusterIP   10.43.7.96     <none>       443/TCP

NAME                          DESIRED   CURRENT   READY   UP-TO-DATE   AVAILABLE   NODE SELECTOR            AGE
daemonset.apps/virt-handler   1         1         1       1            1           kubernetes.io/os=linux   3m49s

NAME                              READY   UP-TO-DATE   AVAILABLE   AGE
deployment.apps/virt-api          1/1     1            1           4m14s
deployment.apps/virt-controller   2/2     2            2           3m49s
deployment.apps/virt-operator     2/2     2            2           5m30s

NAME                                         DESIRED   CURRENT   READY   AGE
replicaset.apps/virt-api-98cf864cc           1         1         1       4m14s
replicaset.apps/virt-controller-5d65ddf8c5   2         2         2       3m49sreplicaset.apps/virt-operator-865f487cf6     2         2         2       5m30sNAME                            AGE     PHASEkubevirt.kubevirt.io/kubevirt   4m36s   Deployed
Install the virtctl binary for starting, stopping, and using the console of VMs
$ curl -Lo virtctl https://github.com/kubevirt/kubevirt/releases/download/${KUBEVIRT_VERSION}/virtctl-${KUBEVIRT_VERSION}-linux-amd64
$ chmod +x virtctl
$ sudo cp virtctl /usr/local/bin
$ export KUBECONFIG=/etc/rancher/k3s/k3s.yaml
$ sudo chmod +r /etc/rancher/k3s/k3s.yaml
So, something I noticed is that if the version of the kubevirt client is not exactly the same as the kubevirt server, it acts really bizarre. You may have to force a download of the matching version.
$ virtctl version
Client Version: version.Info{GitVersion:"v1.3.0-rc.1", GitCommit:"d1cf0d0d2419ea582ae172509431aaf2276b7344", GitTreeState:"clean", BuildDate:"2024-06-26T14:54:43Z", GoVersion:"go1.22.2 X:nocoverageredesign", Compiler:"gc", Platform:"linux/amd64"}
Server Version: version.Info{GitVersion:"v1.2.2", GitCommit:"1466b658f78b9b8bb9517ffb6dafd4b777f33fe6", GitTreeState:"clean", BuildDate:"2024-06-06T05:46:26Z", GoVersion:"go1.21.8 X:nocoverageredesign", Compiler:"gc", Platform:"linux/amd64"}
To fix this
$ curl -Lo virtctl https://github.com/kubevirt/kubevirt/releases/download/v1.2.2/virtctl-v1.2.2-linux-amd64
  % Total    % Received % Xferd  Average Speed   Time    Time     Time  Current
                                 Dload  Upload   Total   Spent    Left  Speed
  0     0    0     0    0     0      0      0 --:--:-- --:--:-- --:--:--     0
100 43.2M  100 43.2M    0     0  22.9M      0  0:00:01  0:00:01 --:--:-- 34.6M

$ chmod +x virtctl

$ ./virtctl version
Client Version: version.Info{GitVersion:"v1.2.2", GitCommit:"1466b658f78b9b8bb9517ffb6dafd4b777f33fe6", GitTreeState:"clean", BuildDate:"2024-06-06T04:42:11Z", GoVersion:"go1.21.8 X:nocoverageredesign", Compiler:"gc", Platform:"linux/amd64"}
Server Version: version.Info{GitVersion:"v1.2.2", GitCommit:"1466b658f78b9b8bb9517ffb6dafd4b777f33fe6", GitTreeState:"clean", BuildDate:"2024-06-06T05:46:26Z", GoVersion:"go1.21.8 X:nocoverageredesign", Compiler:"gc", Platform:"linux/amd64"}

$ sudo cp virtctl /usr/local/bin
Make sure you have hardware virtualization turned on in Linux
(If you do not, your VM will fail to start with error "ErrorUnschedulable")
$ sudo apt install cpu-checker
$ sudo kvm-ok
INFO: /dev/kvm exists
KVM acceleration can be used
Perform a "smoke test"
This YAML is used by kubectl to create a very small, simple, 30MB disk, Linux VM
$ kubectl apply -f https://kubevirt.io/labs/manifests/vm.yaml
virtualmachine.kubevirt.io/testvm created

$ kubectl get vm
NAME     AGE   STATUS    READY
testvm   50s   Stopped   False

$ virtctl start testvm
VM testvm was scheduled to start

$ kubectl get vm,vmi,pod
NAME                                AGE     STATUS    READY
virtualmachine.kubevirt.io/testvm   2m37s   Running   True

NAME                                        AGE   PHASE     IP           NODENAME     READY
virtualmachineinstance.kubevirt.io/testvm   23s   Running   10.42.0.28   xubuntu-vm   True

NAME                             READY   STATUS    RESTARTS   AGE
pod/virt-launcher-testvm-pjqqz   3/3     Running   0          23s

$ virtctl console testvm
Successfully connected to testvm console. The escape sequence is ^]

login as 'cirros' user. default password: 'gocubsgo'. use 'sudo' for root.
testvm login: cirros
Password:$ free -m             total         used         free       shared      buffersMem:            43           35            7            0            1-/+ buffers:                 34            8Swap:            0            0            0$ uname -aLinux testvm 4.4.0-28-generic #47-Ubuntu SMP Fri Jun 24 10:09:13 UTC 2016 x86_64 GNU/Linux$ df -hFilesystem                Size      Used Available Use% Mounted on/dev/vda1                29.7M     23.0M      5.0M  82% /
OK, the simple "smoke test" Linux VM is running, and we can login to the console. To exit the console, just press CTRL-]
Install a Full, Custom, Debian VM
The "smoke test" VM was a tiny, bare bones, VM. For a full VM, it would be nice to choose the disk size and the Linux distribution.
In order to define kubevirt VM disks as Kubernetes Persistent Volumes, we need to install the kubevirt Containerized Data Importer (CDI). Kubebyexample has some node instructions on installing CDI here.
$ kubectl get storageclass
NAME                   PROVISIONER             RECLAIMPOLICY   VOLUMEBINDINGMODE      ALLOWVOLUMEEXPANSION   AGE
local-path (default)   rancher.io/local-path   Delete          WaitForFirstConsumer   false                  3d1h

$ export VERSION=$(curl -Ls https://github.com/kubevirt/containerized-data-importer/releases/latest | grep -m 1 -o "v[0-9]\.[0-9]*\.[0-9]*")

$ echo $VERSION
v1.59.0

$ kubectl create -f https://github.com/kubevirt/containerized-data-importer/releases/download/$VERSION/cdi-operator.yaml
namespace/cdi created
customresourcedefinition.apiextensions.k8s.io/cdis.cdi.kubevirt.io created
clusterrole.rbac.authorization.k8s.io/cdi-operator-cluster created
clusterrolebinding.rbac.authorization.k8s.io/cdi-operator created
serviceaccount/cdi-operator created
role.rbac.authorization.k8s.io/cdi-operator created
rolebinding.rbac.authorization.k8s.io/cdi-operator created
deployment.apps/cdi-operator created

$ kubectl create -f https://github.com/kubevirt/containerized-data-importer/releases/download/$VERSION/cdi-cr.yaml
cdi.cdi.kubevirt.io/cdi created

$ kubectl get cdi -n cdi
NAME   AGE   PHASE
cdi    61s    Deployed
OK. Now let's create a 64GB "Data Volume" that will be the boot disk for our Debian VM.
dennis@xubuntu-vm:~$ kubectl create -f - <<EOF
apiVersion: cdi.kubevirt.io/v1beta1
kind: DataVolume
metadata:
name: "debian"
spec:
source:
http:
url: "https://cloud.debian.org/images/cloud/bullseye/latest/debian-11-generic-amd64.qcow2"
pvc:
accessModes:
- ReadWriteOnce
resources:
requests:
storage: "64Gi"
EOF
datavolume.cdi.kubevirt.io/debian created
$ kubectl get dv,pvc,vm,vmi
NAME PHASE PROGRESS RESTARTS AGE
datavolume.cdi.kubevirt.io/debian WaitForFirstConsumer N/A 45m
NAME STATUS VOLUME CAPACITY ACCESS MODES STORAGECLASS VOLUMEATTRIBUTESCLASS AGE
persistentvolumeclaim/debian Pending local-path <unset> 45m
NAME AGE STATUS READY
virtualmachine.kubevirt.io/testvm 3d1h Running True
NAME AGE PHASE IP NODENAME READY
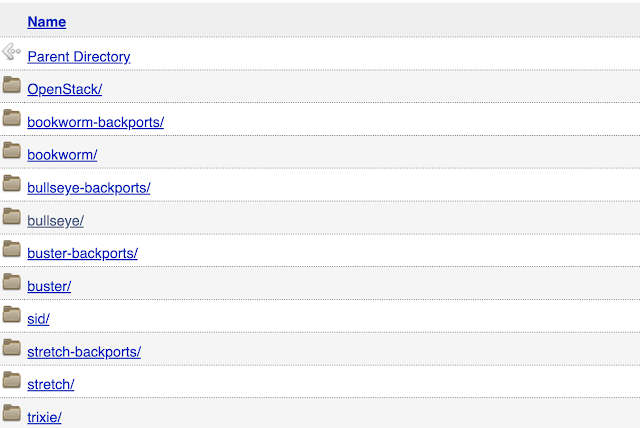
virtualmachineinstance.kubevirt.io/testvm 3d1h Running 10.42.0.28 xubuntu-vm TrueYou can find other debian qcow2 images for use with QEMU or kubevirt (which is using QEMU) at this site. You can find Ubuntu images here and Fedora images here.

Well, that 64GB Debian Data Volume is waiting for a VM to use it, so let's use it.
$ kubectl create -f - <<EOF
apiVersion: kubevirt.io/v1
kind: VirtualMachine
metadata:
  labels:
    kubevirt.io/os: linux
  name: debian
spec:
  running: true
  template:
    metadata:
      creationTimestamp: null
      labels:
        kubevirt.io/domain: debian
    spec:
      domain:
        cpu:
          cores: 1
        devices:
          disks:
          - disk:
              bus: virtio
            name: disk0
          - cdrom:
              bus: sata
              readonly: true
            name: cloudinitdisk
        resources:
          requests:
            memory: 2G
      volumes:
      - name: disk0
        persistentVolumeClaim:
          claimName: debian
      - cloudInitNoCloud:
          userData: |
            #cloud-config
            system_info:
              default_user:
                name: dennis
                home: /home/dennis
            password: SuperSecretPassword!
            chpasswd: { expire: False }
            hostname: debian-k8s
            ssh_pwauth: True
            disable_root: false
            ssh_authorized_keys:
            - ssh-rsa YOUR_SSH_PUB_KEY_HERE
        name: cloudinitdisk
EOF
virtualmachine.kubevirt.io/debian created
Notice the sections where you can define the number of CPU cores, the amount of RAM, a user account, that user's initial password, and the hostname. Also notice where we specified the Persistent Volume Claim name that we created in the last step.
Let's check on our VM
$ kubectl get dv,pvc,vm,vmi
NAME                                PHASE       PROGRESS   RESTARTS   AGE
datavolume.cdi.kubevirt.io/debian   Succeeded   100.0%                56m

NAME                           STATUS   VOLUME                                     CAPACITY   ACCESS MODES   STORAGECLASS   VOLUMEATTRIBUTESCLASS   AGE
persistentvolumeclaim/debian   Bound    pvc-b9cb1c01-eed2-478b-994a-933bc1a6287c   64Gi       RWO            local-path     <unset>                 56m

NAME                                AGE    STATUS    READY
virtualmachine.kubevirt.io/debian   8m8s   Running   True
virtualmachine.kubevirt.io/testvm   3d1h   Running   True

NAME                                        AGE    PHASE     IP           NODENAME     READY
virtualmachineinstance.kubevirt.io/debian   8m8s   Running   10.42.0.38   xubuntu-vm   True
virtualmachineinstance.kubevirt.io/testvm   3d1h   Running   10.42.0.28   xubuntu-vm   True

$ virtctl console debian
Successfully connected to debian console. The escape sequence is ^]

debian-k8s login: dennis
Password: [SuperSecretPassword!]
Linux debian-k8s 5.10.0-30-amd64 #1 SMP Debian 5.10.218-1 (2024-06-01) x86_64

The programs included with the Debian GNU/Linux system are free software;
the exact distribution terms for each program are described in the
individual files in /usr/share/doc/*/copyright.

Debian GNU/Linux comes with ABSOLUTELY NO WARRANTY, to the extent
permitted by applicable law.

dennis@debian-k8s:~$ df -h
Filesystem      Size  Used Avail Use% Mounted on
/dev/vda1        60G  873M   57G   2% /
virtctl Options
While running virtctl --help, I noticed some interesting options
$ virtctl --help
virtctl controls virtual machine related operations on your kubernetes cluster.

Available Commands:
  addvolume         add a volume to a running VM
  completion        Generate the autocompletion script for the specified shell
  console           Connect to a console of a virtual machine instance.
  create            Create a manifest for the specified Kind.
  credentials       Manipulate credentials on a virtual machine.
  expand            Return the VirtualMachine object with expanded instancetype and preference.
  expose            Expose a virtual machine instance, virtual machine, or virtual machine instance replica set as a new service.
  fslist            Return full list of filesystems available on the guest machine.
  guestfs           Start a shell into the libguestfs pod
  guestosinfo       Return guest agent info about operating system.
  help              Help about any command
  image-upload      Upload a VM image to a DataVolume/PersistentVolumeClaim.
  memory-dump       Dump the memory of a running VM to a pvc
  migrate           Migrate a virtual machine.
  migrate-cancel    Cancel migration of a virtual machine.
  pause             Pause a virtual machine
  permitted-devices List the permitted devices for vmis.
  port-forward      Forward local ports to a virtualmachine or virtualmachineinstance.
  removevolume      remove a volume from a running VM
  restart           Restart a virtual machine.
  scp               SCP files from/to a virtual machine instance.
  soft-reboot       Soft reboot a virtual machine instance
  ssh               Open a SSH connection to a virtual machine instance.
  start             Start a virtual machine.
  stop              Stop a virtual machine.
  unpause           Unpause a virtual machine
  usbredir          Redirect a usb device to a virtual machine instance.
  userlist          Return full list of logged in users on the guest machine.
  version           Print the client and server version information.
  vmexport          Export a VM volume.
  vnc               Open a vnc connection to a virtual machine instance.
Let's take a few of these options in turn
console: We've already covered this one
guestinfo: If you have installed the qemu-guest-agent package in your Linux vm, this command provides everything you might need to know about the running Linux OS
virtctl guestosinfo debian
{
[SNIP]
  "guestAgentVersion": "5.2.0",
  "supportedCommands": [
  "hostname": "debian-k8s",
  "os": {
    "name": "Debian GNU/Linux",
    "kernelRelease": "5.10.0-30-amd64",
    "version": "11 (bullseye)",
    "prettyName": "Debian GNU/Linux 11 (bullseye)",
    "versionId": "11",
    "kernelVersion": "#1 SMP Debian 5.10.218-1 (2024-06-01)",
    "machine": "x86_64",
    "id": "debian"
  },
  "timezone": "UTC, 0",
  "userList": [
    {
      "userName": "dennis",
      "loginTime": 1720663137.621031
    }
  ],
  "fsInfo": {
    "disks": [
      {
        "diskName": "vda15",
        "mountPoint": "/boot/efi",
        "fileSystemType": "vfat",
        "usedBytes": 11161600,
        "totalBytes": 129718272
      },
      {
        "diskName": "vda1",
        "mountPoint": "/",
        "fileSystemType": "ext4",
        "usedBytes": 1123741696,
        "totalBytes": 27422138368
      }
    ]
  },
  "fsFreezeStatus": "thawed"
}
ssh: set up passwordless login to the VM
If you create the VM with access to your laptops public key, you can then use passwordless ssh to access the VM. These are the steps:
$ kubectl create secret generic my-pub-key --from-file=key1=/Users/faucherd/.ssh/id_rsa.pub
secret/my-pub-key created

$ vi debian-vm.yaml
[SNIP]
     accessCredentials:
      - sshPublicKey:
          source:
            secret:
              secretName: my-pub-key
          propagationMethod:
            qemuGuestAgent:
              users:
              - dennis
      volumes:

$ kubectl create -f debian-vm.yaml
virtualmachine.kubevirt.io/debian created

$ virtctl ssh --local-ssh dennis@debian
Linux debian-k8s 5.10.0-30-amd64 #1 SMP Debian 5.10.218-1 (2024-06-01) x86_64

The programs included with the Debian GNU/Linux system are free software;
the exact distribution terms for each program are described in the
individual files in /usr/share/doc/*/copyright.

Debian GNU/Linux comes with ABSOLUTELY NO WARRANTY, to the extent
permitted by applicable law.
Last login: Thu Jul 11 19:04:46 2024 from 10.42.0.51
dennis@debian-k8s:~$
vnc: Open up a graphical VNC connection to the VM
This option requires the remote-viewer app to be installed on the client machine or to proxy VNC connections from your client machine with "virtctl vnc --proxy-only testvm". the remote-viewer app can be installed for different operating systems using the instructions on this page. I use a Mac client, so these are my instructions:
$ brew tap jeffreywildman/homebrew-virt-manager
$ brew install virt-manager virt-viewer
$ virtctl vnc debian
Exciting. Opened up TigerVNC automagically on my Mac

Connecting via non-proxied VNC on a Linux client was pretty straightforward:

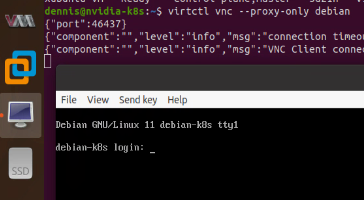
Here are the instruction to proxy the VNC port on a Mac client and use a native Mac VNC app (TigerVNC):
$ virtctl vnc --proxy-only debian
{"port":54953}
{"component":"","level":"info","msg":"connection timeout: 1m0s","pos":"vnc.go:157","timestamp":"2024-07-11T15:46:19.091701Z"}
{"component":"","level":"info","msg":"VNC Client connected in 9.943800333s","pos":"vnc.go:170","timestamp":"2024-07-11T15:46:29.035611Z"}

..and it worked. Amazing.

Here is the same working proxy connection on a Linux client

Success
Thank You
Well, there you have it. Thanks for following along. I hope this saves you some time or at least provides some educational value. I welcome your feedback