SUSE Harvester 101
In this blog
SUSE Harvester 101

Why?

Well, the Broadcom acquisition of VMware, and subsequent packaging and pricing changes, have caused customers to look for options. To be the most help to my customers, I have been getting my hands on as many "VMware Alternatives" as possible - Nutanix, Proxmox, OpenShift Virtualization, Harvester, KVM. See this post by me on KVM.
What?
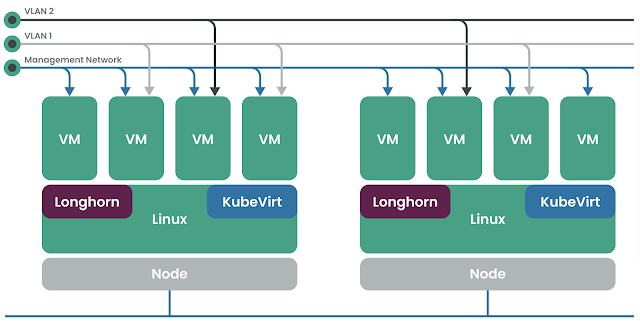
So, in terms of enterprise alternatives to vSphere, I am seeing two leading solutions - Nutanix and K8S/Kubevirt. In the K8S/Kubevirt camp, there is RedHat OpenStack and SUSE Harvester. SUSE Harvester is K8S + Kubevirt in an HCI package. Each node provides CPU, memory, and distributed storage (Longhorn) to the HCI cluster.
The bare metal requirements are reasonable:
- CPU: x86_64 - 8 cores for testing
- RAM: 32 GB for testing
- Disk: Fast. I failed on spinning disk, but was very successful on NVMe.
- An ISO from this page. (I used harvester-v1.3.1-rc2-amd64.iso which I copied to a handy Ventoy boot USB key.)
How?
Install on Bare Metal
Harvester is super easy to install on a single node which made it easy to test. I used these instructions.
- Boot from the ISO
- Follow the instructions above. NB: The text based installer is a little wacky. You don't know whether the press space/Tab/Enter to change the options in the fields. Taking the defaults works in most cases. You will have to provide a cluster token (any word will do) and a password. These are some of the screens you will see:


After install you will see this happy screen:

- Point your browser to https://[Management IP]/dashboard and you will see something like my dashboard (minus the VMs)

Create a Virtual Machine
Create a Unique Namespace for VMs
(Not a requirement, but namespaces keep things tidy in Kubernetes)
Click on Namespaces on the left and the Create button on the right

Upload a VM Boot ISO
Let's give our VM an installation ISO.
Click on Images on the left and the Create button on the right

Choose your namespace, type a name, type a description
Either upload and ISO and provide the URL to an ISO

Click Create and you will get a progress speedometer

Create a VM Network

A VM Network sits on a Cluster Network. The built-in Cluster Network is a host-only network. To allow VMs to access the outside world, and to allow the outside world to access the VMs, you need to create and external Cluster Network and then place a VM Network there.
Cluster Network
I have a second NIC in my server, so I created an external Cluster Network on that NIC.
First, I created a very simple Cluster Network named "nic2"

Then I created a Network Config for that Cluster Network and gave it a description.

I only have one node, so I took the default Node Selector of "Select all nodes"

I chose my second NIC from the drop down and left the rest of the fields at their defaults.
VM Network
Now onto the VM Network. Choose "VM Networks" in the left menu

Click Create

Give your VM Network a name, a description, choose VLAN or Untagged, choose the Cluster Network it should ride on. If you chose VLAN, specify the VLAN ID. Click Create again.
Create a VM

Choose Virtual Machines in the left menu
Click Create
Define Name, CPU & RAM. Name must be lowercase.

Define your Boot ISO as Type CD-ROM (The size field is not important)

Click Add Volume to add the root disk (Note the light gray "boot order" specification)

Choose your external network

Those are the most important steps. You can skip the other steps for a simple VM.
Now click Create
You will see your new VM listed as "Unschedulable" for a minute. This is a red herring. Just ignore this. 🙂

After about a minute, the VM state will change to "Running"

You can now open a graphical console and install the OS as usual


Once installed and rebooted, the new VM should be on the network segment you specified. Yay.

What's nice is that Harvester automagically displays the IP address of the VM in the list of VMs

Backup a VM
There are many options to protect your new VMs. Regular scheduled backups are not available in the GUI, but I'm sure you could write a shell script that runs regularly in cron.

Thank You
Thanks for reading this post. I hope you found the post informative. I welcome your feedback, corrections, and improvements.